MARTIE PARTY TIP: BAR ESSENTAILS AND TIPS FOR SERVING DRINKS AT A PARTY

Where’s the bar” is the first question arriving party guests will ask as you greet them at the door. The bar is the central gathering place for many parties—even if alcoholic beverages aren’t served. Every bar should be equipped with basic tools, mixers, and spirits; when tools are not handy, it is difficult to get drinks out quickly. Lines begin to form and guests stand empty handed—a big party foul. Here’s a guide for building your bar. The quantities you will need will depend on how many guests you are serving, of course. If you’re not offering a full bar but serving a signature cocktail or just beer and wine, you certainly won’t need this extensive set-up; pick and choose what suits your needs from the list below. 

IMG_1216.jpg

Here are a few secrets I’ve figured out over the years….

  • Put something under your ice bucket or iced down beverages so you don’t end up with a wet tablecloth.
  • Get two back up bottle openers and put them away. Bottle openers not only break, but they seems to walk away at most parties, especially at outdoor parties and tailgates. If possible, tie the bottle opener or wine opener to your ice chiller or cooler using a pretty ribbon or twine. 
  • I often put an inexpensive plastic backed painter’s dropcloth under my nice tablecloth for the bar just in case there’s a spill. Some dropcloths have a cloth surface so they look great for casual settings.
  • For casual occasions, it is perfectly fine to use or rent one type of glass or stemware to be used for wine, iced tea and water.
  • When serving a signature cocktail, I often mix the base a day in advance and freeze it. Remove it an hour before guests arrive so it can slightly thaw. Add chilled liquor just before serving and stir well.
  • I get large multi-gallon plastic jugs from the restaurant supply store to pre-mix all of my beverages. Store these in the refrigerator, freezer or in a cooler to keep them cold and you won’t need as much ice.
  • Estimate 4.5 glasses of wine per bottle and 4 glasses of Champagne per bottle.
  • Estimate guests will drink approximately 1 drink per hour.
  • Have plenty of water and sparkling water available; pass glasses of chilled water on a tray to make sure guests don’t overindulge.
  • Make sure you are not cooling cans or bottles in the cooler with the ice for beverages. Have one cooler just for “clean” ice and provide a scoop and an ice bucket for service so guests won’t be tempted to scoop with their glass.

TOOLS

Ice Bucket

Tray

Ice Tongs

2 Bottle Openers

2 Wine Openers or Corkscrews

Blender

Juicer

2 Martini or Cocktail Shakers

2 Double Jiggers- the dual cone shaped measuring device

Shot Glass

Measuring Spoons

Muddler- essential for drinks like the Mojito

Cutting Board

2 Paring Knives

Zester

Stirrers or long cocktail spoons

Cocktail napkins

Assorted glassware

MIXERS

Club Soda

Tonic

Sour Mix

Water

Coke

Diet Coke

7-Up or Sprite

Ginger Ale

Orange Juice

Grapefruit Juice

Cranberry Juice

Pineapple Juice

Tomato Juice or Bloody Mary Mix

Horseradish

Tabasco

Worcestershire Sauce

Lime Juice

Lemon Juice

GARNISHES

Lemons

Limes

Oranges

Celery

Olives of all types, stuffed, etc

Maraschino cherries

Bitters

Fresh Mint

Salt

Pepper

Margarita Salt

SPIRITS

Vodka

Bourbon

Scotch

Rum

Gin

Tequila

Triple Sec

WEDDINGS: PLAN A WEDDING IN ONE WEEK? YES, I DID!

When a lifelong friend and longtime bachelor calls you on April Fool’s Day and says… “I got engaged yesterday and I want to get married THIS coming Saturday AND we want you to plan the wedding”… the normal reaction is to bust out laughing. Which I did. But when he says he’s serious, it is time to jump on the planning ASAP. Here’s how I pulled together a beautiful, sentimental family wedding in only one week. And here are the photos to prove it.

Wedding in a Week Martie Duncan
Wedding in a Week Rustic Theme Martie Duncan

When you have less than a week to pull together a wedding, you don’t have time to procrastinate and stress about the decisions you are making. You have to make decisions and move on… and that’s what we did. No time to sweat the little things! Trusting your planner is essential:)

I was the vendor for just about everything. I was the planner, the chef, the florist, and even rental delivery… just about everything. What I could not make, I purchased. The one vendor I did hire was the photographer, Mo Davis from Arden Photography. Mo is a rock star, capturing every moment and every detail. Advice to brides: don’t skimp on the photos. The pictures and the memories last a lifetime. AND I must thank my sweet friends Jared and Corey from The Sonnet House in Leeds, Alabama. Corey made the lovely bridal bouquet and boutonnieres… aren’t they beautiful!

Wedding in a Week Bridal bouquet Martie Duncan
Wedding in a Week flowers Martie Duncan

For the decor, the couple wanted a rustic theme to fit the farm setting so we used bales of pine straw, pots of spring flowers, branches, burlap, moss, Mason jars, rustic lanterns, and lots of candles. The pine straw along with the flats and pots of spring flowers were used at the front gate and also for the ceremony site. The couple has already planted those in their yard to enjoy all summer long. We also did not want to have to worry with rental china so we opted for this eco-friendly recycled paper and bamboo place settings which were recycled again after the event!

Wedding in a Week Rustic decor Martie Duncan

We continued the rustic theme throughout the decor and for the food service. Wooden serving trays, cutting boards, bowls were all used. Charcuterie of cured meats, cheeses, and sausages plus grilled lamb pops were waiting for guests after the ceremony. For the main course, we kept it down on the farm with smoked pulled pork over organic grits and collard greens. For dessert, the two-tiered wedding cake was vanilla butter cream and filled with layers of homemade lemon curd and raspberry preserves. Since there was going to be a fire in the fire pit after dark, I made my signature s’mores with Nutella instead of a groom’s cake and also made plenty as favors for guests to take home.

Wedding in a Week Bourbon Bar Martie Duncan
Wedding in a Week Rustic Theme Martie Duncan
Wedding in a Week Family Table Martie Duncan
Wedding in a Week Take Home S'mores Favors Martie Duncan
Wedding in a Week DIY Fireworks Display Martie Duncan

Wishing a lifetime of happiness to my sweet friends… thank you for letting me be a part of your day! Thanks to my assistant Caroline, my grill master Brad, Lauren, Kristal, and Sohaila along with Mo and Jared and Corey from the Sonnet House in Leeds. You made this easy!


RECIPE: BANANA PUDDING BITES

It really doesn't get much more Southern than Banana Pudding. You will rarely go to any event or party and not see Banana Pudding on the menu. While it is wildly popular, Banana Pudding just doesn’t look beautiful once you remove the first spoonful. I was asked to serve Banana Pudding for a charity event in Chicago but I wanted it to look elegant for this elegant occasion. I wasn't sure what to do but  I had some pate a choux (dough) left over from some cream puffs hanging out in the fridge and it hits me! Put the insides of the banana pudding into puff shell! This dough makes the best little puffs and they are hollow. Perfect for filling. The experiment was a total success. Best of all, these tasted just like the banana pudding my mother used to make! BLISS! 

One bite banana pudding is so pretty and easy to serve- it has been a huge hit with everyone who has tried them!

One bite banana pudding is so pretty and easy to serve- it has been a huge hit with everyone who has tried them!

ONE BITE BANANA PUDDING

I have 3 components to this recipe: the pate a choux, the pastry cream filling and the meringue top. I have it broken down into segments below. You don’t even have to do it all at one time. I made the choux the day before serving. I made the pastry cream the following morning and I made the meringue just before I wanted to put them in the oven. The meringue will not hold so plan on using it as soon as you whip it up. Hope you love these!

*CHEF’S NOTE: For assembly, you will need 1-2 ripe bananas

CREAM PUFF DOUGH RECIPE (Pate a Choux)

Makes about 22-28 small puffs depending on how large you pipe them out

Prep: 10 minutes    Bake: 20 minutes 

Supplies: Cookie sheet, parchment paper, piping bags or ziptop bags (don’t use a cheap one- it will break)

This is a classic Pate a Choux dough. I always mix mine by hand because I don’t want to wash the extra bowl of the mixer but some believe (Alton Brown and Jacques Pepin for example) that you have to use a mixer to incorporate the eggs. I did a blind taste test and I cannot tell the difference in taste nor in texture or appearance.

1 cup water

1 stick unsalted butter

1/2 teaspoon sugar

1/8 teaspoon salt

1 cup all purpose flour

4 eggs 

Line a baking sheet with parchment paper. Get out a large measuring cup or short glass (I find a pint mason jar works great) and put the zip top bag into it, open the top of the bag. This will give you some stability as you spoon the dough into the bag.

Preheat oven to 425 degrees F.

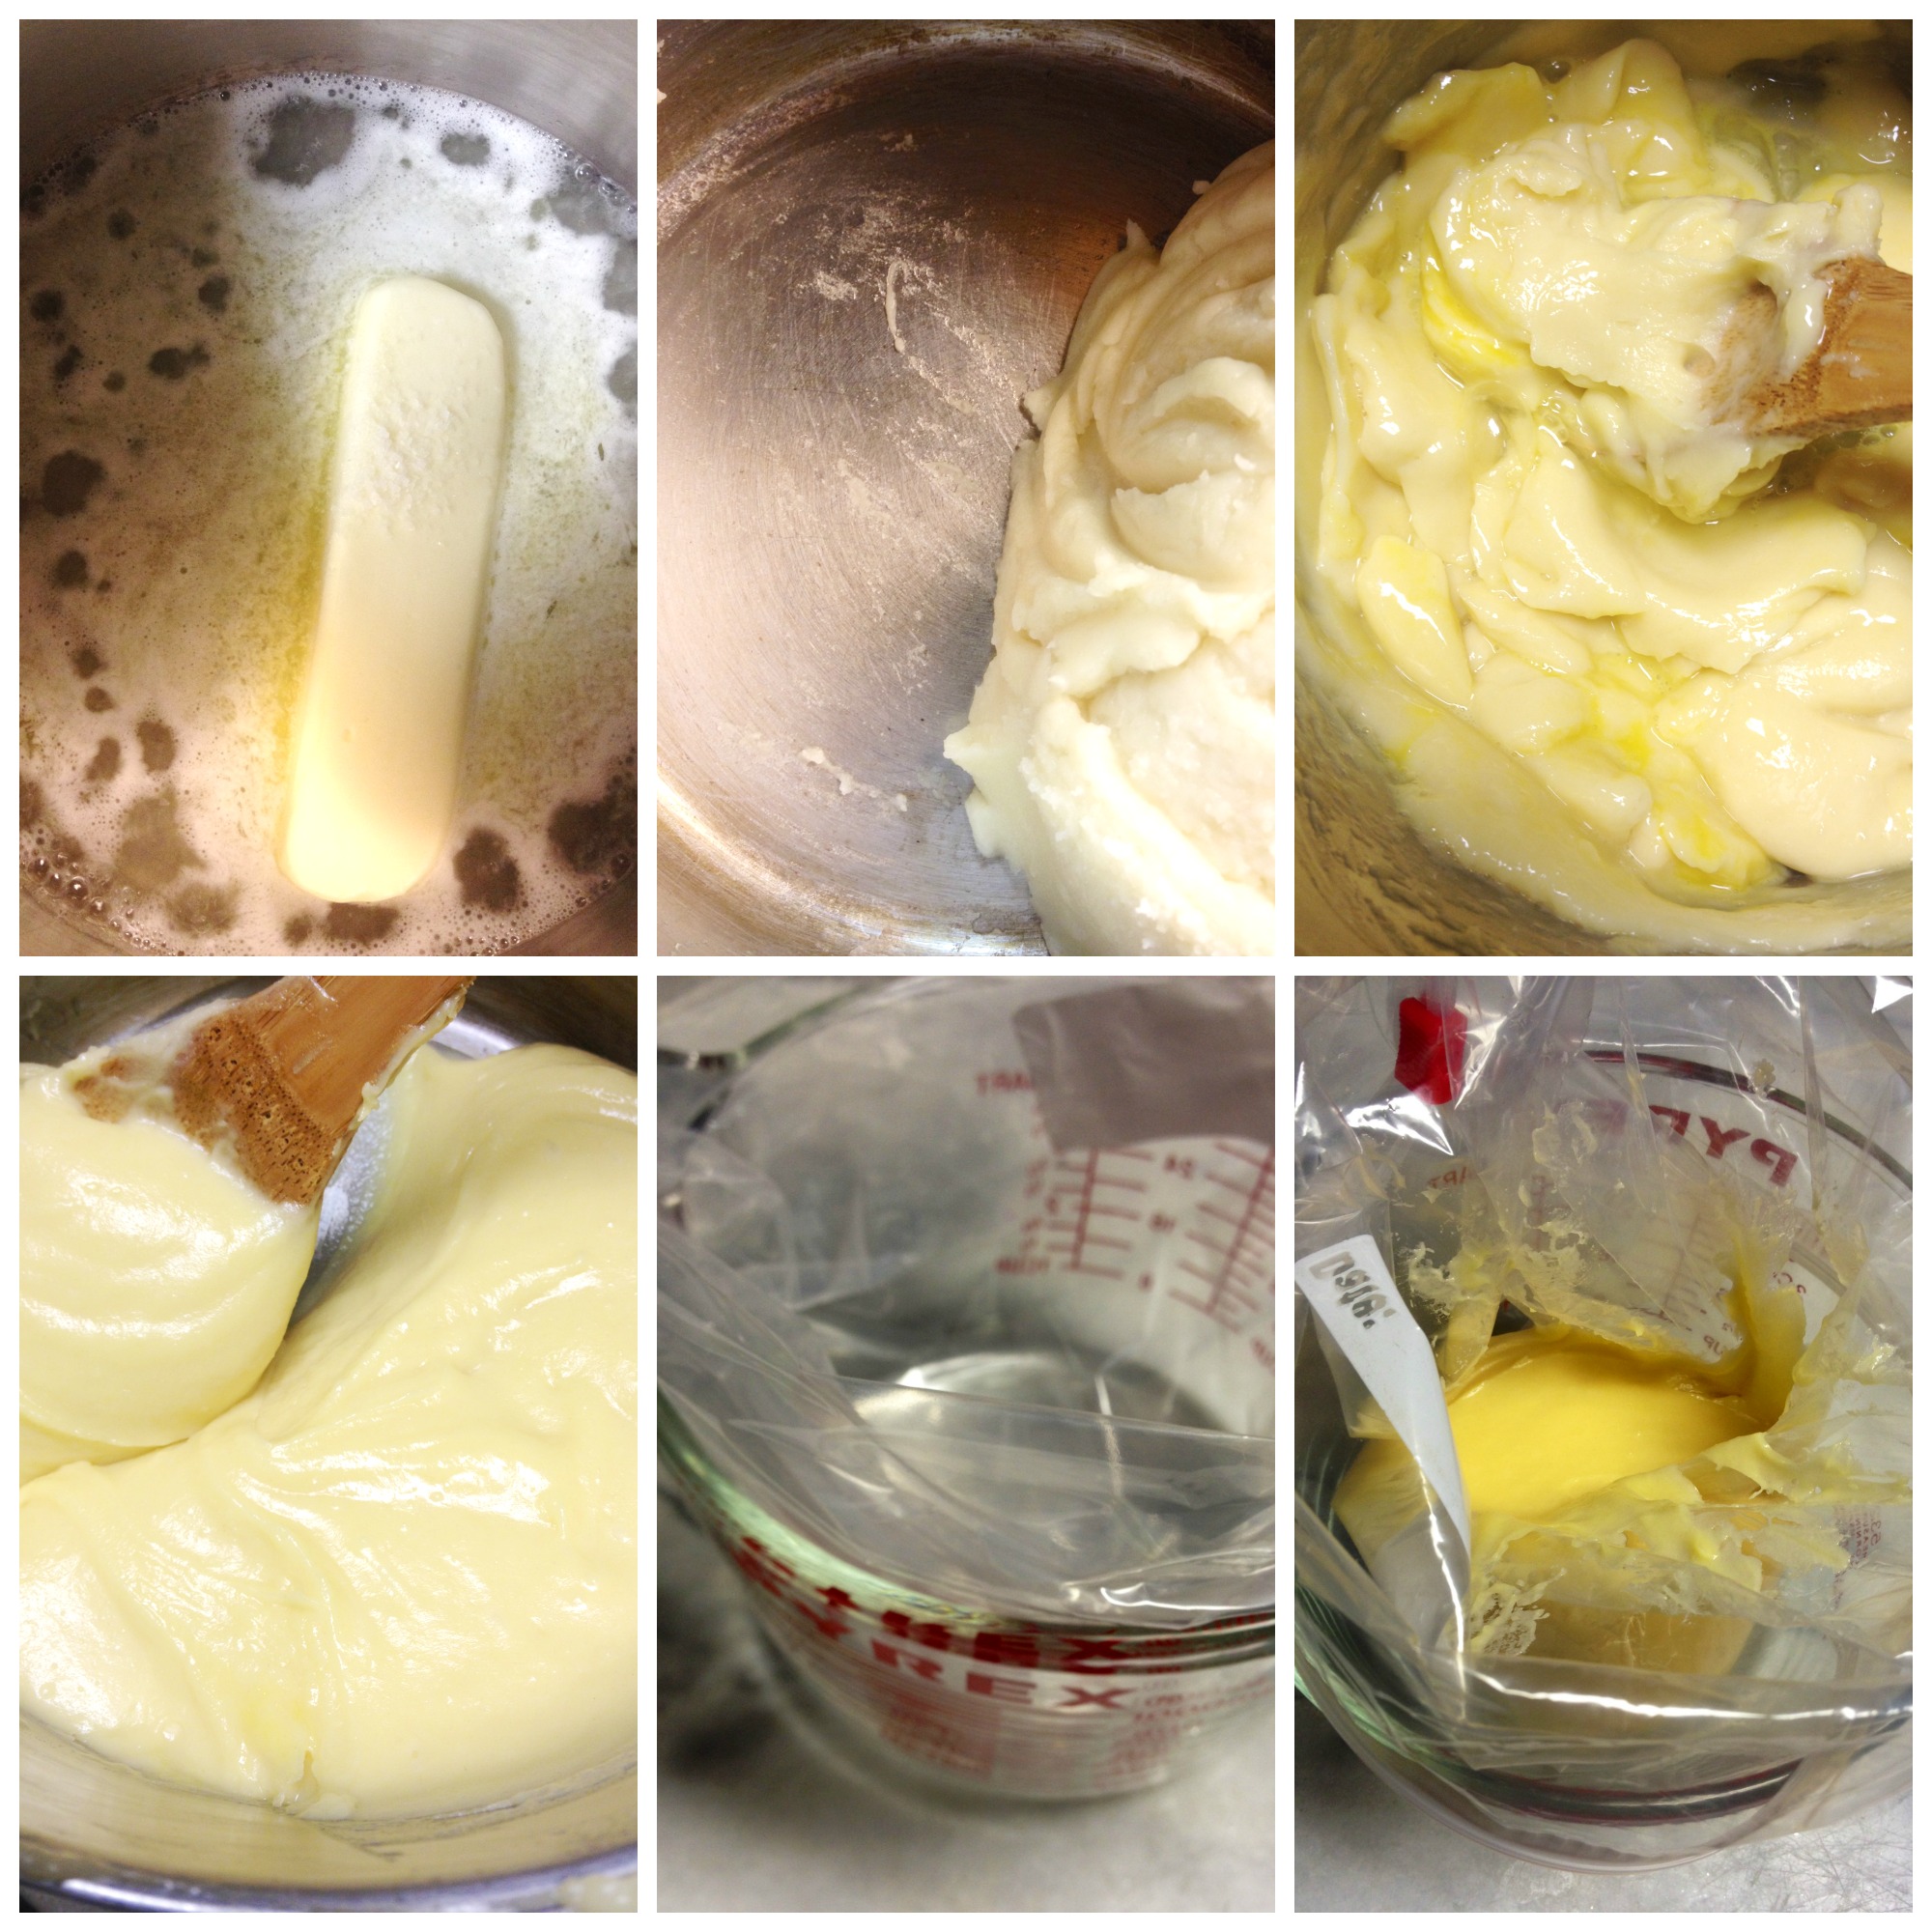
Put the water, butter, salt and sugar in a large saucepan and bring to a boil. Boil until the butter is just melted. Reduce the heat to very low. Add the flour all at one time, mixing with a wooden spoon. Cook over low heat until you start to see a little “film” on the bottom of the pan- only about 1 minute or even less. The dough will come together in a ball. Remove from the heat and allow to cool just a little bit but not too much; the dough has to be warm to accept the eggs. If the dough is too hot, you cook the eggs. This is not good.

If you are using a mixer, this is the time to transfer the dough to the bowl of your mixer. I use the same saucepan and put it on top of a dish towel to keep it from slipping around as I beat in the eggs. It is essential to add the eggs one at a time to your dough. I usually put all 4 eggs in a small bowl and just slip them in, one at a time, beating each with a wooden spoon until it is incorporated then I add the next egg and repeat. At first, it will seem as if you’ve made a mistake but do not stop. In a few seconds, the dough will go from slippery to a bit sticky as the egg is accepted into the dough. Do this 4 times. Take care not to be too aggressive with the wooden spoon because I have actually tossed an egg out onto the floor… that is how slippery the dough is in the beginning.

Once you have the eggs fully incorporated, spoon the dough into the pastry bag or zip top bag you have set up. You can use it right away or it will hold beautifully in the fridge until you are ready to use it. I have waited a day or more, in fact, but let the dough sit out at least 20 minutes before you try to pipe it onto the baking sheet or you may blow out the side of the zip top bag. Again, not good.

Pipe the dough into heart shaped or little puffs (see photo at the top) For the heart, draw the outside and then fill in the middle. For the puffs, I find that swirls don’t cook as pretty as simply applying pressure to the bag until the puff is the size I want, then pull the bag back. It forms a little tip when you do this so before you put the into the oven, wet your finger with water and push down any little peaks so they don’t burn.

Bake the puffs for 10-12 minutes at 425 degrees. Open the door and quickly rotate the pan and reduce the heat to 350 degrees for 10-12 more minutes. It is important not to simply switch the pan to an oven set to 350. The puffs will deflate.

I’ve had to trial and error this timing with my oven… and to my taste. I don’t want dried out puffs but I also don’t want them too wet or eggy. Grab one out, let it cool slightly and check the inside to see if it is what you want. If so, remove them from the oven. If not, give them a minute more.

Take a small paring knife or even a toothpick and puncture the top of the puff so the steam can escape. Allow them to cool on a rack before filling.

Put the water, butter, and salt in a pot, bring to boil. Add the flour all at once off the heat but put it back on the heat and cook for a minute or two until a slight film starts to form on the bottom of the pan. Remove from the heat. Add the eggs,…

Put the water, butter, and salt in a pot, bring to boil. Add the flour all at once off the heat but put it back on the heat and cook for a minute or two until a slight film starts to form on the bottom of the pan. Remove from the heat. Add the eggs, stirring them in one at a time until each one is fully incorporated before adding the next. Spoon into a ziptop bag; I like to put it over a large bowl or measuring cup to make it easier.

Spoon the Pate a Choux into a piping bag or ziptop bag. Snip the end. Pipe onto baking sheet lined with parchment. Use some water on your finger to push down the peak before baking. Let them cool on a rack. Pierce the puff with a knife to allow the …

Spoon the Pate a Choux into a piping bag or ziptop bag. Snip the end. Pipe onto baking sheet lined with parchment. Use some water on your finger to push down the peak before baking. Let them cool on a rack. Pierce the puff with a knife to allow the steam to escape.

PASTRY CREAM

For my banana pudding, I did not use a vanilla bean like I normally would because I didn’t want the bean flecks in the custard. 

Makes 2 1/2 cups

Prep: 5 minutes    Cook: 12 minutes      Chill: 10 minutes

Supplies: Large bowl filled 1/2 full with ice and water

1 cup heavy cream

1 cup milk plus 3 ounces more (a little more than 1)/2 cup)

2 teaspoons pure vanilla extract plus a tiny drop each of almond and lemon extract

8 egg yolks in a medium heat-proof bowl

1/2 cup granulated sugar

6 tablespoons cornstarch

1/4 stick unsalted butter 

Make an ice bath in a heat proof bowl by filling it 1/2 full with ice and water.

Put 1 cup of milk and the cream  in a large saucepan. Bring to a simmer. (you will see the little bubbles foaming around the edges of the pot)

Remove from the heat.

Add the sugar to the yolks and whisk for 30 seconds to help dissolve the sugar.

Put the saucepan back onto medium heat and bring it back to a simmer. Once you reach the simmer, temper the eggs by briskly whisking a small amount of the hot mixture into the eggs; keep whisking constantly; adding a little more of the hot mixture into the eggs. Continue whisking it in until you have it all incorporated and then return to the saucepan. 

Next, use a fork to whisk/dissolve the cornstarch into the remaining 3 ounces of milk. I just use the measuring cup because it shows the ounces on the outside. It is just under 1/2 cup of milk.

Put the saucepan back over medium heat. Whisk in the cornstarch mixture. Continue whisking or stirring over medium heat. As you are stirring, suddenly, you will notice it beginning to thicken up. Don’t think you have ruined it or curdled it. Just keep stirring until it just comes to a boil and is thick. Remove from the heat. 

Put the saucepan into the ice bath you prepared earlier; take care not to allow any water to get into the pan and continue stirring to cool the custard a bit. Add the vanilla, almond and lemon extracts plus the butter and stir until it is completely melted and incorporated. Transfer to a bowl and cover the surface with plastic wrap or spoon into a piping bag. Refrigerate until ready to use.

ASSEMBLY

1. Slice the tips off of the puffs. Eat or save for later.

2. Pipe a dollop of pastry cream into the puff.

3. Slice a banana and add one slice on top of the pastry cream.

4. Pipe more pastry cream into each puff, filling it completely.

5. Make the meringue (see recipe below) and top each puff.

6. Bake until the meringue is golden brown.

7. Eat 3-4 as soon as they come out of the oven while warm.

MAKE THE MERINGUE TOPPING

I learned how to make meringue from my mom and I love the way hers was always so light and fluffy. However, my sweet and uber talented pastry chef friend, Geri-Martha taught me to first whisk the egg whites and the sugar together over a double boiler to dissolve the sugar so there is no grit remaining. For the photo above, I did not use the double boiler method, but for the party, I will. I like the texture better if you bother to do the double boiler step. Also, many people use cream of tartar or vinegar in their meringue. I don’t because I personally think it creates more “shrinkage” where the meringue pulls away from the crust.

FYI: The ratio for meringue is 4:1. An egg white is about 1 ounce. Therefore you would use about 1 cup of sugar for every 4 egg whites.

CLASSIC MERINGUE RECIPE

4 egg whites

1 cup granulated sugar

Preheat the oven to 425. Line a baking sheet with parchment paper.

Put the egg whites and the sugar in your mixing bowl (make sure it is heatproof or use a heatproof bowl) over a double boiler that is simmering. Do not let the water touch the bowl and make sure the heat is not a full boil but a simmer.

Rapidly whisk the whites and sugar together until there is no grit remaining. This happens faster than you might think.

Remove from heat. Dry off the bottom and sides of the bowl. Put it on your mixer  stand with the whisk attachment. (if you do not have one, you can just use your hand-held mixer) Start at low speed for 30 seconds then increase the speed to medium high and beat until shiny and stiff peaks form when you lift the whisk from the bowl.

Immediately spoon the whites into a piping bag or zip top bag. They will not hold long. Snip the tip of the bag and pipe onto your prepared shell taking care to ”seal” the edges with the meringue.

Bake at 425 for 4 minutes or until golden brown.