TABLES & DECOR: COTTON CANDY TREE AND CANDY TABLE IDEAS

We did this adorable cotton candy tree and candy table for my sweet friend Kristina’s wedding and it has been the most shared PIN I’ve had on Pinterest. What a fun idea for a wedding reception, a birthday party or centerpiece for a candy bar or candy table buffet for any occasion: anniversaries, baby showers, graduation parties, sweet sixteen parties, Quinceañera or even school parties for Easter or Valentine’s Day parties. Since you can find or make cotton candy in almost any color, it is a great way to tie a color scheme to your party theme.

Martie Duncan Make a Cotton Candy Tree

COTTON CANDY TREE HOW-TO

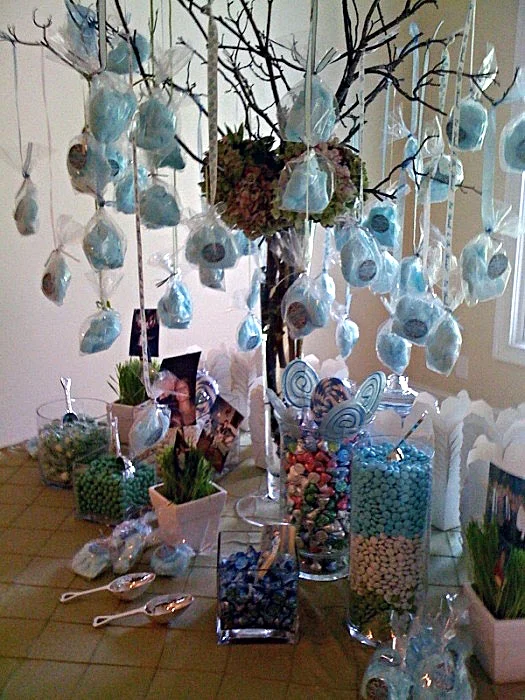
Decide on a color for the candy. You can readily find cotton candy in lots of colors- even at the dollar store and Wal-Mart. Kristina’s wedding colors were blue and green so she opted for blue cotton candy. There are lots of online stores for cotton candy with tons of colors and cheaper prices if you have the time to order. You can always make your own cotton candy but you’ll need to use it quickly; it will not hold more than a day before it begins to shrink and  sort of melt. If the weather is very humid, you’ll need to use it immediately.

Get tiny glycine envelopes or plastic treat bags from the party store or hobby store. Make up labels with your name, monogram, or a photo and affix them to the bag. Oriental Trading Company has the clear mini-treat bags $1.99 for two dozen.

You’ll need a tree branch for the arrangement. A manzanita branch works well. I got branches from the yard… but hobby or floral supply stores have several different types if you don’t happen to have a yard.

Secure the branches in a tall vase. You’ll need something to really weight it down. The “trunk” part of the branch needs to be pretty long if you are going to use a tall vase. We used river rock in the base for weight and filled the vase with water so it was very heavy. Be sure to push the tree to the center of the table so children will not be tempted to pull on it. You should not use a glass container if the party is for kids. Use a plastic vase or a sand pail filled with sand (add a little water to wet the sand for weight) for a kids party.

Tie the bags of cotton candy to the tree with matching ribbon. We also tied several pairs of mini craft (not pointy) scissors to the tree so guests could snip the cotton candy. To make sure the centerpiece tied in with the other wedding decor, I clustered some Hydrangea in wedding colors around the top of the vase.

Under the cotton candy tree, we put glass bowls, cylinders, and vases filled with different candies along with mini Chinese take-out boxes so guests could take home a treat from the couple. Easter candy is out so now would be a good time to find an assortment in the stores… but the day after Easter, all of the left-over candy will be 1/2 off so stock up for your next party or wedding.

HOW TO BUILD A BLOODY MARY BAR

Perfect for Sunday Brunch, game day, bowl games, or Super Bowl Sunday, or even for New Year's Day, this Build-it-Yourself Bloody Mary Bar is a hit every time! The best Bloody Mary I have ever had was in New Orleans at the Super Bowl. Since then, I've always kicked off Super Bowl Sunday with a Bloody Mary.

how to build a bloody mary bar for the Super Bowl

Part salad bar, part drink bar, the Bloody Mary bar is becoming a popular interactive addition to parties and restaurant bars everywhere. Every region has their own mix-ins and flavorings but one thing is consistent; everyone thinks their version is the best.

Let your guests build their own Bloody Mary with garden fresh veggies, swimmers like shrimp or oysters and a variety of different ways to add heat- from hot sauce to peppers.

Let your guests build their own Bloody Mary with garden fresh veggies, swimmers like shrimp or oysters and a variety of different ways to add heat- from hot sauce to peppers.

As a Southerner, I would lose my membership card if I didn’t know how to make a good Bloody Mary. Southerners like a Bloody Mary to be spicy, heavy on the horseradish and loaded with fresh vegetables —a garden in a glass. To set up your own Bloody Mary bar, a cleared kitchen counter works well. You’ll need to keep your veggies chilled so put them in glasses, place in a low container or bowl and fill around the glasses with ice. Use large glasses for serving since it will be packed with veggies and mix-ins until the flavor is just right. Long teaspoons are best to mix up the goodies—a plastic stirrer just won’t cut it. Have lots of wipes or towels on hand for spills and don’t use a white tablecloth for this one. I often get a painter's drop cloth at the hardware store; they are usually made of a taupe material and have a stitched hem so once pressed, they work very nicely. Get my Bloody Mary recipe... 

If you don't want to make your own Bloody Mary mix like I do, my go-to favorite is Zing-Zang. You can find it at most grocery stores. 

Set up a rimming station and let guests rim glasses with a mixture of Old Bay seasoning, Kosher salt, and a dash of pepper.


BLOODY MARY BAR SHOPPING LIST

VODKA:  Use your favorite vodka. Sometimes I use Absolut Peppar and rim glasses with a pepper and sea salt mixture before adding liquids and mix-ins.

MIX: Get one or two types of bottled mix or good organic tomato juice for the base or you can make your own Bloody Mary base using my recipe.

FLAVOR AND SPICE: Almost anything can add extra flavor to the base. These are some of the traditional flavorings.

Lea & Perrin Worcestershire

Celery salt

Old Bay Seasoning (look at the fish counter if you can’t find it with the seasonings)

Cocktail Sauce

HEAT: Offer guests several types of hot sauce, everyone has a favorite.

Tabasco Original

Louisiana Hot Sauce

Fresh ground pepper

Red pepper flakes

Fresh ground horseradish

CONDIMENTS: Pick and choose several of these. Celery and lemon and most traditional but a squeeze of lime and pickled okra are other favorites.

Celery stalks

Lemon wedges

Lime slices

Olives

Pickled okra

String beans

Cocktail onions

Cherry tomatoes

Pickled asparagus

SWIMMERS: Take it up a notch by adding fresh chilled seafood.

Boiled shrimp

Raw oysters

Clam juice

Having a DIY Bloody Mary Bar for Easter Brunch or Mother's Day will become a tradition your guests will love year after year and because you can set it and forget it, it makes very easy work of bartending duties.

FOOD SAFETY TIP: Remember to keep cold foods and seafood chilled to 140 degrees or colder for the length of the party.

Print Friendly and PDF

KITCHEN TIP: HOW TO MAKE THE PERFECT HARD BOILED EGG

In the South, we love our deviled eggs. They always show up on our holiday menus but sometimes, they are less than delicious. If you are tired of unpredictable boiled eggs and that ugly green band around the outside of the egg yolk, here’s how to get perfect hard-boiled eggs every time. No more rubber eggs!

These eggs are so delicate and delicious, all you need is a little salt and pepper after you peel them.

These eggs are so delicate and delicious, all you need is a little salt and pepper after you peel them.

HOW TO MAKE THE PERFECT HARD BOILED EGG

Use a stainless steel pot- don’t use a non-stick pan.

Layer the eggs in the pan leaving some room between them. Cover with tepid/room temperature water by one inch. Bring the eggs to a low boil, frequently giving them a gentle stir to move them about a bit. This motion will help keep the yolk centered and result in a more even egg white. You know how it seems one side is thicker than the other? The stirring will help prevent that.

The cooking time will depend on the size of the egg.

Medium eggs = 4 minutes

Large eggs = 5 minutes

Extra-large eggs = 6 minutes

Once the eggs reach a low boil, immediately set a timer and reduce the heat to medium high.

When the timer goes off, turn the heat off and allow the eggs to stand for the same amount of time you boiled them for—4, 5, or 6 minutes —stirring occasionally. 

Once the second timer goes off, place the pot in the sink and run cold water over the eggs to cool them just enough to handle them. Pop each egg on the larger side-where the air pocket is. Put them back into the water. Immediately peel the eggs while they are warm. You can store them in the fridge until you are ready to use them but they are harder to peel when they are cold.

The tip is to make sure to pierce the membrane when you peel-it makes the whole process easier. If the membrane is tough, I will usually pinch it to pierce it. The shell peels much easier that way.

You can also lightly roll the egg on the counter with your hand and the shell should crack and peel away easily. Some people also use a teaspoon- pushing the spoon between the egg and the membrane and gently rolling the spoon to pull the shell off.

Want a recipe to go with those perfectly hard-boiled eggs? Try my deviled egg recipe or my favorite way to serve them by making a deviled egg bar so guests can design and create their own flavors.