RECIPE: OLD FASHIONED SOUTHERN LEMON MERINGUE PIE

My mom was an amazing pie maker- I've said it a million times. She made a pie or cobbler almost every single day and when I'd come home to Birmingham from my travels, I always knew I could always count on there being a Lemon Meringue Pie waiting for me.  It is one of my favorite memories and certainly one of my favorite pies. Make one of these for someone special in your life and start a tradition of your own.

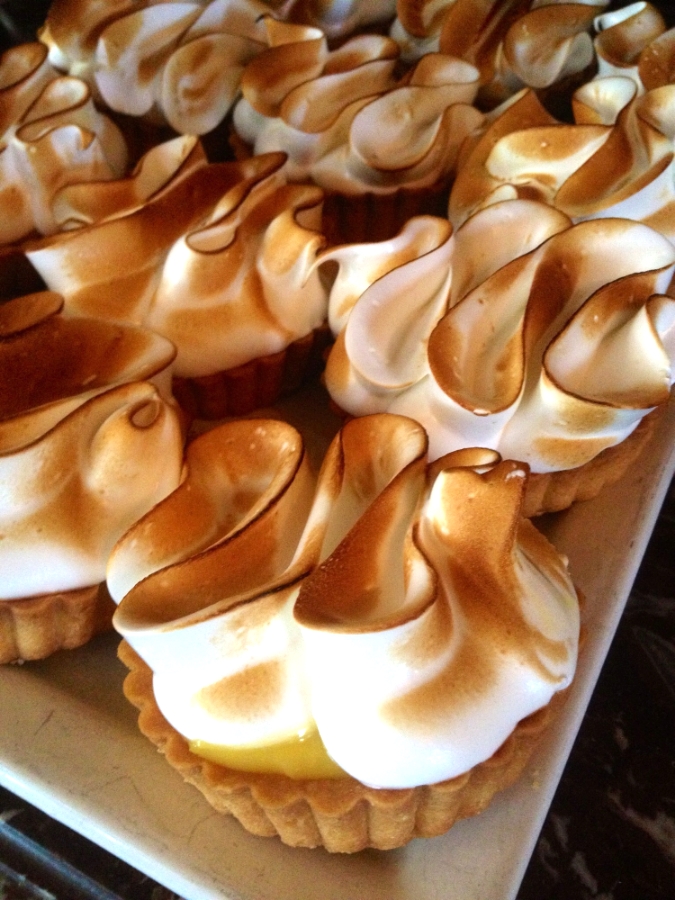
I wish I could take credit for those gorgeous swirled tarts on the right- those are from Chez Fonfon in Birmingham. I just wanted to show you that meringue can be a light to deep golden brown, depending on your taste. They make the swirls using a large pastry bag fitted with a wide, flat tip.

OLD-FASHIONED SOUTHERN LEMON MERINGUE PIE

For a 9 inch pie or 8 tarts, depending on the size of your tart pans

INGREDIENTS

1- pie crust for a 9" pie plate, pre-baked (homemade or store bought)

LEMON MERINGUE FILLING

1 cup sugar

3 tablespoons cornstarch

1/4 teaspoon salt

1 3/4 cups whole milk

4 large egg yolks, beaten well. (Save the egg whites for the meringue)

1 1/2 teaspoons finely grated lemon zest

1/3 cup freshly squeezed lemon juice

3 tablespoons butter, room temperature

MERINGUE

5 egg whites

1/4 cup plus 2 tablespoons sugar

1/2 teaspoon cream of tartar (find it in the spice aisle)

1/2 teaspoon vanilla

DIRECTIONS:

Preheat the oven to 350 degrees F.

FOR THE FILLING: Separate the egg yolks and whites. Put the yolks in a heat-proof bowl and beat them until they are slightly thickened. Add the sugar, salt, and cornstarch to a medium saucepan. Use a fork to combine the ingredients. Add the milk, 1/4 cup at a time, whisking each addition to incorporate very well. Cook over medium heat, stirring constantly, until the mixture comes to a boil. Boil exactly one minute, stirring constantly to keep it from burning. Remove from the heat. Carefully temper the egg yolks with the hot mixture by whisking 1/4 cup of the hot liquid into the eggs, stirring to incorporate. Whisk another 1/4 cup of the hot mixture to the eggs and then turn the tempered egg mixture into the saucepan.

Cook over medium heat for 3 minutes, stirring constantly. Remove from the heat. Add the lemon zest, lemon juice, and butter. Stir well to combine. Set aside. 

FOR THE MERINGUE: Put the egg whites in a very clean mixing bowl. Beat on high speed for 30 seconds until the whites are frothy. Add the cream of tartar, beating on medium high until soft peaks form. Next, add the sugar, one tablespoon at a time until all the sugar is added and stiff, shiny peaks form. This takes about 3-4 minutes. Beat in the vanilla.

ASSEMBLY: Some people butter the bottom of a baked pie shell to act as a barrier between the filling and the crust so it won't get soggy. I did not do this step but you can if you like. Pour the filling into the pre-baked crust. Spread the meringue over the pie filling. The key is to make sure to spread the meringue all the way to the edges so the meringue doesn't shrink away from the crust as it bakes.

Bake the pie at 350 degrees F. for 15 minutes or until the meringue is golden. Cool the pie on a wire baking rack until it is cool (about 1 hour) and then put it into the refrigerator to cool completely before cutting it. (I usually allow it to chill in the fridge for at least 3 hours before serving. You can chill it less time but the filling might be not be completely set.)

Print Friendly and PDF

RECIPE: TRADITIONAL SOUTHERN FRIED CHICKEN

People usually associate Southern cooking with three things: Biscuits, BBQ, and Fried Chicken. I probably need to get my passport revoked because I have not until today, put up a single blog post or recipe on fried chicken. Fried chicken is a lot like BBQ sauce or potato salad. Every Southern cook has their own version and usually, a couple of good stories to go with it. Here's mine...

My mom grew up in a children's home in Troy, Alabama during very hard times. The kids all had to have a job and my mom always preferred to be in the kitchen. Once a week there would be fried chicken and they would have to go out in the yard and catch the chicken, kill it, clean it and then help cook it. Ugh. Hard to imagine. Mom taught me how to cut up a whole chicken and her techniques for frying. The big secret is the buttermilk. Don't skip that step... makes the chicken so juicy.  Here is my mom's recipe. I still use her cast iron skillet when I make it.

I don't often make fried chicken these days but when I do, it is always the star of the party.

I don't often make fried chicken these days but when I do, it is always the star of the party.

TRADITIONAL BUTTERMILK SOUTHERN FRIED CHICKEN

INGREDIENTS

1 whole chicken with skin, cut up (about 3 pounds)

2 cups buttermilk

1 tablespoon kosher salt + 1 teaspoon

1 teaspoon black pepper + ½ teaspoon

1/4 teaspoon cayenne

1 teaspoon paprika

3 cups self-rising flour

6-8 cups Canola oil for frying based on the size of your skillet or Dutch oven

Special equipment: Thermometer for frying and a meat thermometer

DIRECTIONS:

Put the chicken pieces in a large zip top bag. Pour the buttermilk over it and close. Toss to coat all of the chicken. Put the bag in a bowl and place it in the refrigerator for 8-24 hours to soak, turning the bag occasionally.

When you are ready to fry, fit a deep cast iron skillet or Dutch oven with a thermometer. Pour in the oil about 1 ½ to 2’ deep. Over medium high heat, bring the oil up to 360 degrees. You want to try to keep the oil at 360 during frying process. It will drop as you put in the chicken but let it come back to 360 degrees before adding more.

Combine the 1 tablespoon salt, 1 teaspoon pepper, cayenne, and paprika. Remove the chicken from the buttermilk and discard the buttermilk. Season the chicken liberally with the spice mixture on all sides.  

Put the flour plus 1 teaspoon salt and ¼ teaspoon pepper in a zip top bag. (Back in the day, we used a brown paper bag.) Take the chicken, one or two pieces at a time and put into the flour mixture. Shake well to coat. Lightly shake off excess. Put on the baking rack after you have coated each piece.

When the oil is up to temperature, use the tongs to carefully put the coated pieces of chicken into the hot oil. Do this in batches, taking care not to overcrowd or put too many pieces in the pan at one time. You will lower the oil temperature and the skin will not be crispy. Cook the chicken for 15-20 minutes, turning occasionally until the chicken is deep golden brown and delicious. Remove one piece of chicken and check the temperature with a meat thermometer at the thickest part of the breast or thigh but away from the bone. Chicken should be cooked to 165 degrees F. Drain on a rack covered with a brown paper bag. You may want to lightly sprinkle the hot chicken with a little salt. That’s how my mom did it. Hope you like it as much as I love remembering those days standing by the stove with my mom, on chicken duty.

Print Friendly and PDF

SUNDAY POT ROAST WITH ONIONS, CARROTS, AND POTATOES

My mom made a pot roast every other Sunday. On the alternate Sundays we had fried chicken, or a rump roast. I don’t know how she did it- getting four kids ready for church and then minutes after we arrived home, she’d whip up some cornbread and take the pot roast out of the oven. She did not even have to call us in from the yard. We were already at the table. I helped my mom make this dish a hundred times. I wish I’d written down exactly how she did it. She cooked it in her big cast iron Dutch oven- what I always called the “chicken pot” because she used it to fry chicken. Even though I still have that same Dutch oven, it has taken me ten years of trying different options to get the flavor just right. I finally discovered I was leaving out the bay leaf… that was the missing ingredient. Make this recipe for your family. You can be assured that 40 years later, your kids will still remember the taste and the times gathered around the table when you served it.

SUNDAY POT ROAST WITH ONIONS, CARROTS AND POTATOES

INGREDIENTS

1 ½ teaspoons salt

½ teaspoon pepper

1-(3 pound) chuck roast, trimmed (boneless or bone-in, if you prefer)

2 tablespoons all-purpose flour

1 tablespoon olive oil

2 small yellow onions, quartered

3 cups beef broth

1 tablespoon Worcestershire

2 bay leaves

3 thyme sprigs

6 carrots, peeled and halved

6 Yukon gold potatoes, peeled and quartered into wedges

DIRECTIONS:

Preheat oven to 350° F. 

Remove the roast from the fridge. While it is still cold, trim any excess fat from the sides of the cut. In a small bowl, combine the salt and pepper. Season each side of the roast liberally with it. Allow it to sit out for 15 minutes on the counter.

Next, sprinkle 1 tablespoon of flour over each side of the roast, patting it into the top, bottom, and sides.

In a large Dutch oven, heat the olive oil over medium high heat. When the oil and pan are hot, add the roast and sear it well on all sides; approximately 3 minutes for the top and bottom and a minute or so for the sides.

Remove the roast to a plate. Set aside. Add the beef broth a little at a time, scraping up any browned bits from the bottom of the pan. Add the Worcestershire. Bring to a boil. Reduce to a simmer and cook for 2 minutes, whisking occasionally. Remove from heat. Add the onion, bay leaves, and thyme to the pan. Add the roast on top. Cover with the lid and put into the oven at 350° F for 1 ½ hours.

Add the carrots and potatoes. Cook for another hour or until the vegetables are tender (not mushy) and the roast pulls apart easily.

Remove the roast to a plate and shred it. Serve with potatoes, carrots, onion, and a bit of the cooking liquid as gravy.

Note: If you want a thicker gravy, you can make a slurry with flour. Remove the roast and the vegetables to a platter or bowl. Discard the thyme and bay leaves. Add 3 tablespoons of the hot liquid to 1 teaspoon all-purpose flour and whisk until smooth. Turn up the heat under the pan to medium high. Whisk the flour mixture into the cooking liquid and bring to a boil, whisking constantly. Reduce the heat to low and cook for 2-3 minutes more so you cook out the raw flour taste. If the gravy is too thick, you can add more beef broth as desired. Before serving, check the seasoning, adding more salt and pepper to taste.

Print Friendly and PDF