RECIPE: QUICK APPLE TART WITH PUFF PASTRY CRUST

I frequently make homemade pie crust and my Rustic Apple Tart is always a hit. But what if you don't have the 1 hour you need to let the pie crust chill? Well, you can make a beautiful and utterly fabulous bake shop worthy apple tart in minutes! Top it with ice cream and - well- it is just hard to beat.  I recently made this recipe during my demo at the Fabulous Food Show in Cleveland, Ohio and have had a ton of requests for the recipe--so here you go!

Quick Apple Tart with Puff Pastry Crust

Quick Apple Tart with Puff Pastry Crust

QUICK APPLE TART WITH PUFF PASTRY CRUST

INGREDIENTS

1/2 cup granulated sugar

pinch of allspice

pinch of kosher salt

pinch of ground black pepper

2 large apples, cored, peeled and sliced thin with a mandolin(Braeburn work well)

1 lemon, juiced

1 sheet of packaged puff pastry, thawed to package direction

2-3 tablespoons all-purpose flour

3 tablespoons unsalted butter, softened to room temperature

1/2 cup Confectioners sugar (maybe a bit more depending on the size of the tart)

DIRECTIONS: 

Line a baking sheet with parchment paper. Preheat the oven to the temperature recommended by the manufacturer for the puff pastry, usually 400F.  

Mix the granulated sugar, allspice, salt, and pepper together in a bowl. Set aside. 

Pell and slice the apples and squeeze the lemon juice over them to stop any browning.  

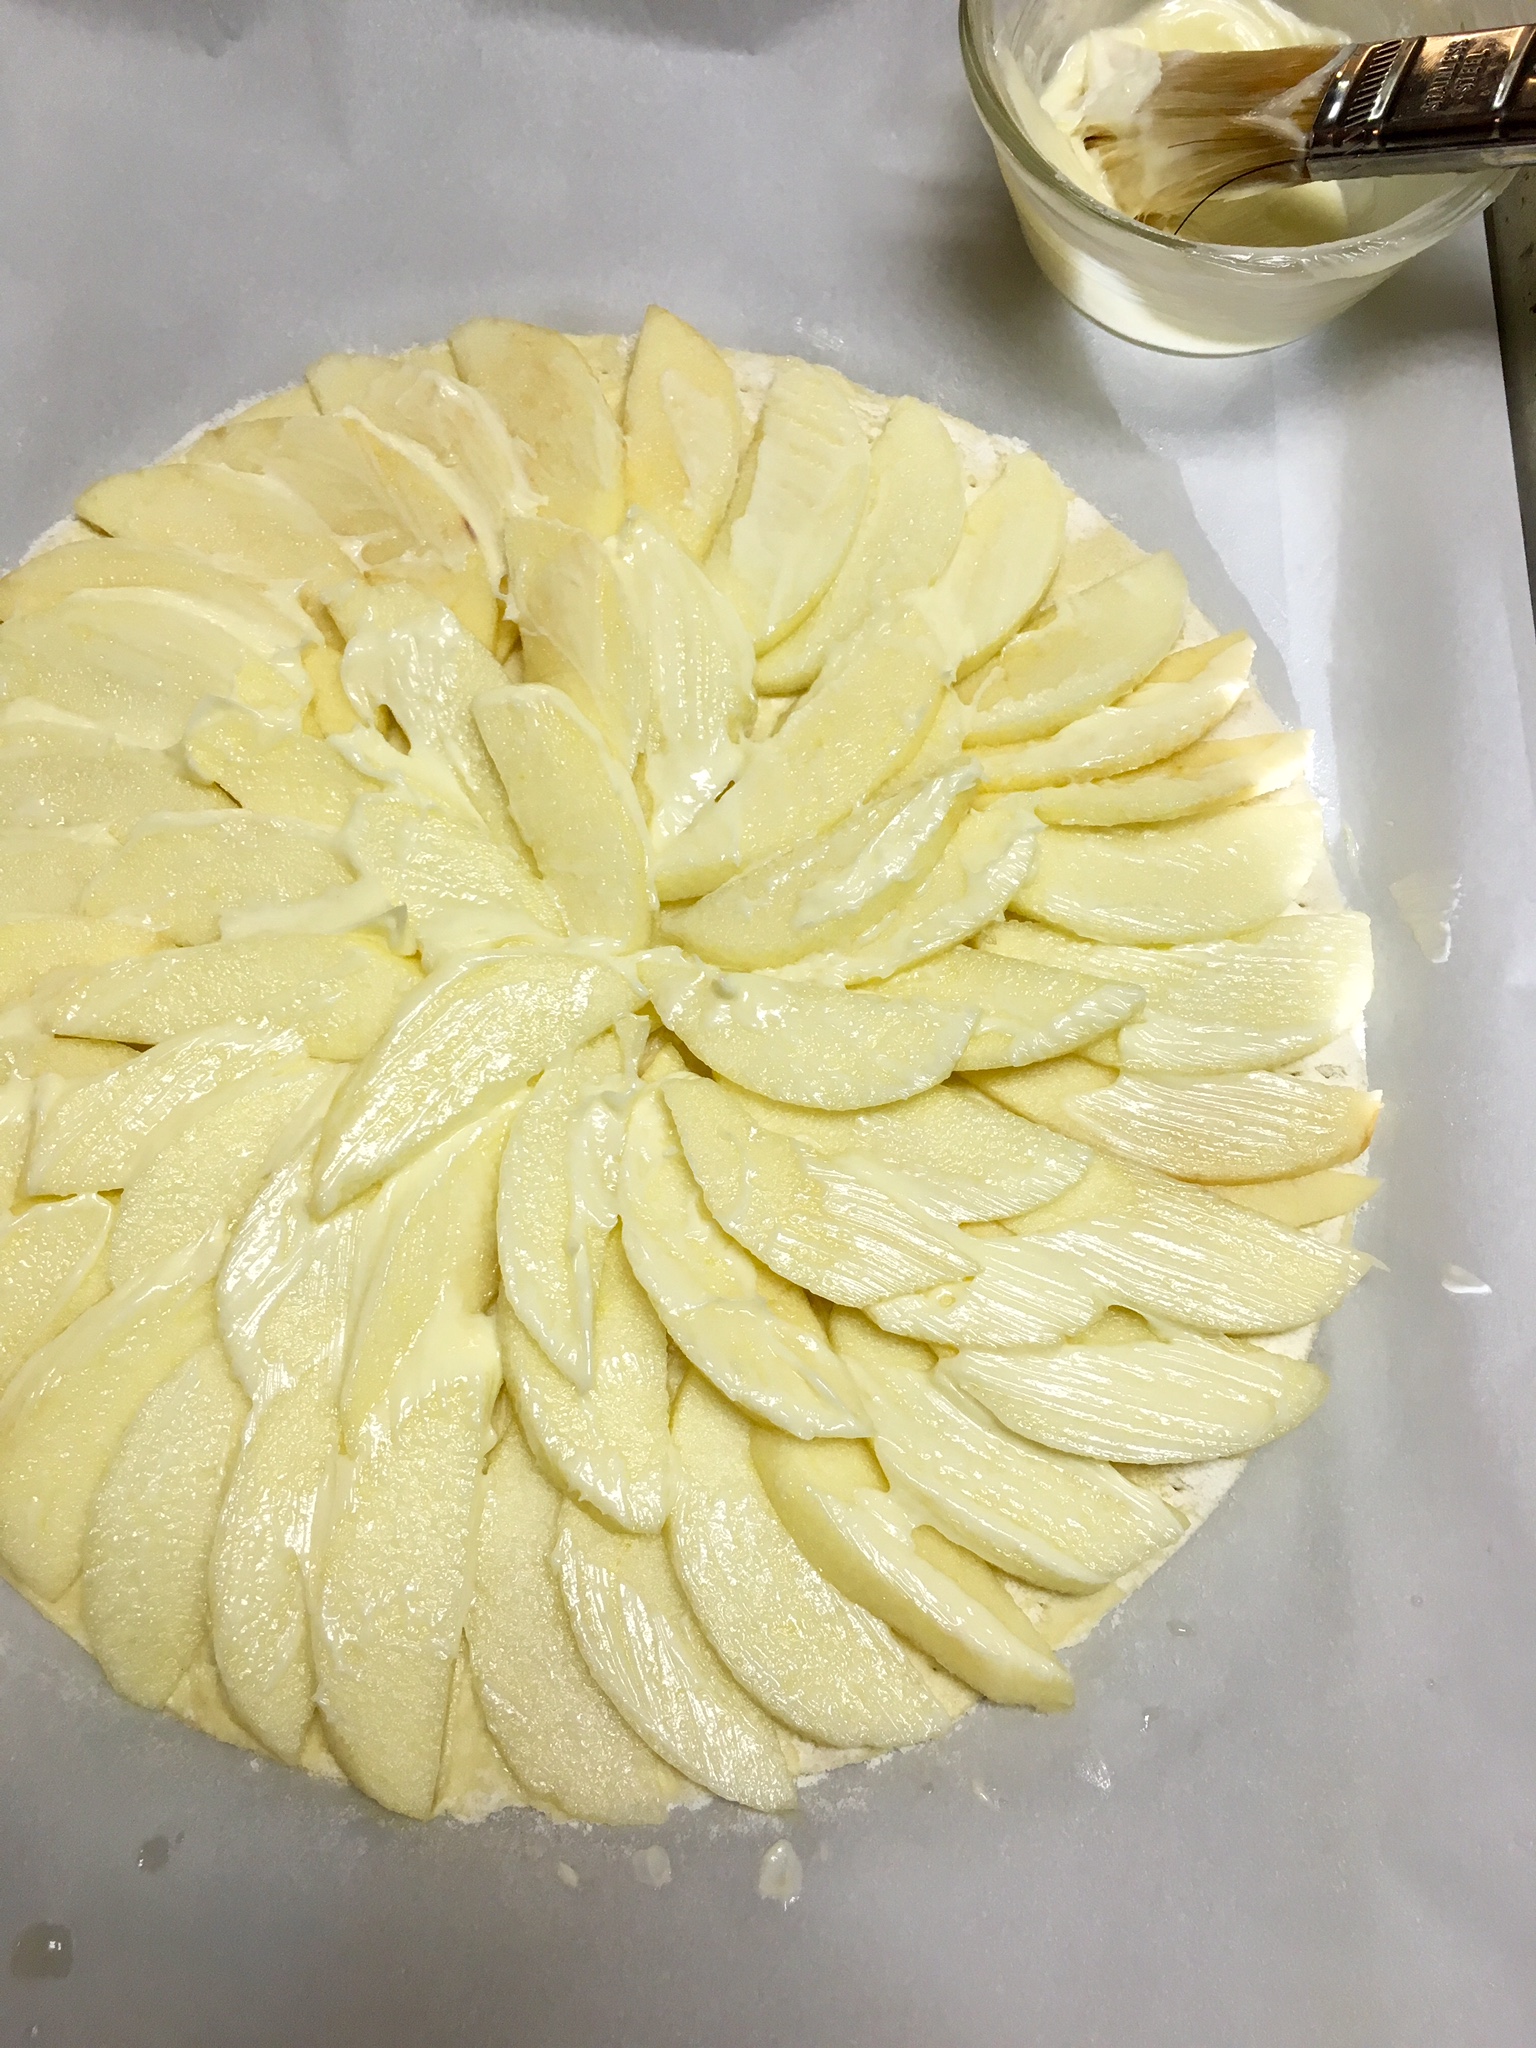
Dust your work surface with a bit of the flour and rolling pin. Lightly roll out the puff pastry and then use a dinner plate as a template to cut it into a circle. (you can make a square but the round is prettier- square more rustic) Place onto the prepared baking sheet.

Dock (prick holes in it) the puff pastry with a fork to prevent it from puffing up too much during the cooking process.  

Place the apple slices on a paper towel to blot off excess moisture before you begin to arrange them on the puff pastry. Arrange the apples in a circle; start on the outside and work towards the inside, slightly overlapping as you go. Use a pastry brush to cover the entire surface of the apples with the softened butter. Cover that with the sugar mixture.  

Bake for 20-25 minutes or until pastry is golden brown and apples are tender.

Remove and immediately dust the top of the apples with the Confectioners sugar using a fine mesh sieve. Use a torch to caramelize the sugar or put under the broiler for 1-2 minutes. Serve with a scoop of Dulce de Leche or caramel ice cream. 

Print Friendly and PDF

RECIPE: RUSTIC APPLE PIE WITH EASY TO MAKE PIE CRUST

Note: I have made this recipe without referencing it for so long, I needed to change the online version so it matches with my current method. I added a bit more flour and reduced the oven by 5 degrees. The rest is the same.

This may be my favorite recipe! You can’t believe how fast and easy you can make a pie! My mom made a pie every single day- most were fruit pies and I always marveled at how fast she could make one. I have used just about everything inside of this pie crust but just make sure the dough is well chilled and the filling is not too juicy or it won’t hold together. The egg wash will act as a glue to keep it sealed. The glaze, if you decide to use one, will make it look like it came from a bakery but it is flakier without it.

To the left is an apple pie I made in minutes. On the right is the same crust, with local Chilton County peaches and blackberries and blueberries from my yard. Note: If you use frozen fruit for the filling, be sure to up the flour a bit so the filling is not too juicy to hold.

You can use this homemade pie crust to make almost any kind of pie, tart, pot pie, or crostata. Leave out the sugar for a savory pie The dough can hold up to a week in the refrigerator before you roll it out. You can make ahead and freeze it, also.

RUSTIC APPLE PIE

Prep Time: 20 minutes plus 1 hour chill time for the dough

Cook Time: 20-25 minutes

INGREDIENTS

Pastry

1 cup all-purpose flour, plus 3 tablespoons and more for dusting to roll out the dough

2 tablespoons granulated or superfine sugar plus 1/2 tablespoon to sprinkle on crust

1/4 teaspoon kosher salt

1/4 pound (1 stick) very cold unsalted butter, diced into cubes

3 tablespoons ice water plus 1 to 1½ more depending on how dough comes together

Filling

11/2 pounds apples (3 large semi-tart apples work best)

1/4 teaspoon grated lemon zest

1-2 teaspoons fresh lemon juice (juice of a whole lemon, essentially)

1/4 cup flour

1/4 cup granulated sugar

1/4 teaspoon kosher salt

1/2 teaspoon ground cinnamon

1/8 teaspoon ground allspice

1 tablespoon cold unsalted butter, diced into small pieces

Egg Wash (optional)

1 egg, well beaten

Glaze (optional)

½ cup Orange Marmalade, Apricot Preserves, or Apple Jelly

Directions:

Preheat the oven to 420 degrees F. Line a baking sheet with parchment paper. Stretch a large piece of plastic wrap out on the counter and dust with flour, about 1 tablespoon.

For the pastry, place the flour, sugar, and salt in the bowl of a food processor fitted with a steel blade. Pulse a few times to combine the dry ingredients. Add the cold cubed butter, a little at a time, pulsing between additions until the butter is the size of peas. Repeat until all the butter is in the bowl but pulse as little as possible. You want to see flecks of butter in the dough.

Next, with the motor running, add the ice water a tablespoon at a time through the feed tube-stop the machine just before the dough becomes a solid mass. Turn the dough onto the well-floured plastic wrap. Handle as little as possible. Form into a round (or whatever shape you want to roll out for the pie.) Don’t over handle or knead or the butter will melt. Fold the plastic around the disc. Refrigerate for at least 1 hour. When you are ready to make the crostata, remove the disc from the refrigerator and allow it to sit on the counter for at least 5 minutes before you begin.

To roll out: Unfold the plastic Flour a rolling pin and put a little flour around the plastic and on both sides of the dough; roll the pastry into an 11-13” circle on the plastic wrap. Add flour as you need to so the dough does not stick. Wrap it over the rolling pin and transfer it to a baking sheet. Remove the plastic wrap.

For the filling, peel, core, and cut the apples. I like the look of slices- I usually slice my apples like this: cut 4 pieces, cutting around the core. Then slice those into half moon shapes. You can leave the peel on if you like but I usually don’t because you need the apples to look perfect if the peel is on. Put the apple into a bowl and toss with the lemon juice and the lemon zest. Next, add the flour, sugar, salt, cinnamon, and allspice. Add the cold butter. Mix all of the ingredients together until the apples are well coated. Turn the apples out onto the crust, leaving a 1 1/2 to 2 inch border all the way around.  Gently fold the border over the apples to enclose the dough, pleating it to make a circle. Finish with the egg wash to seal the folds and sprinkle with granulated sugar over the top and crust before baking.

Bake the crostata for 20-23 minutes, until the crust is nicely browned and the apples are tender. (Note: If you are not using the glaze, bake for another 5-7 minutes or until golden brown)

For the glaze: Microwave the preserves in a heatproof container for 10 seconds. Careful! It will bubble and be HOT! Remove the crostata from the oven. Using a pastry brush, lightly brush the filling and the crust with the melted preserves. Return to the oven for 5-7 minutes or until the pie is golden brown.

Allow to cool slightly- at least 10 minutes before cutting. Add caramel sauce or a scoop of ice cream and it is even better! Hope you enjoy this recipe as much as I have. xox

Print Friendly and PDF

FAVORITE FALL RECIPES: CARAMEL APPLE CAKE

When I was a kid, my mom would make us a cake or pie everyday... usually it was pie but on occasion, she would make Apple Dapple Cake... a recipe she got from someone along the way. It was one of the few recipes she actually used and I have a copy of it in her handwriting... a treasured possession. I took that basic recipe and made it into one of my favorite fall desserts by adding the hot caramel because what is more fall than caramel apples? I like to serve it slightly warm with a scoop of vanilla ice cream.

I served this cake to over 300 guests at the after-party following the Hangout's Oyster Cookoff in November to rave reviews. My mom would be so proud.

Caramel Apple Cake is a wonderfully easy cake to make for fall tailgates, festivals, or Saturday morning coffee.

Caramel Apple Cake is a wonderfully easy cake to make for fall tailgates, festivals, or Saturday morning coffee.

Prep Time: 15 minutes

Cook Time: 1 hour plus 15 minutes

INGREDIENTS

3 cups flour

1 teaspoon salt

1 teaspoon baking soda

1 1/2 cups pecans, chopped fine

3 apples, peeled and chopped fine

1  1/2 cups vegetable oil (like Wesson)

2 cups sugar

3 eggs

2 teaspoons vanilla

HOT CARAMEL SAUCE

1 cup packed brown sugar

3/4 cup whole milk

3/4 cup butter (1 1/2 sticks)

DIRECTIONS:

Spray a tube pan with Baker’s Joy or grease and flour it. Preheat oven to 350.

For the cake: Sift together flour, salt, and baking soda. Add apples and pecans. Stir to coat the fruit. Mix together oil, sugar, eggs, and vanilla. Add to the fruit mixture. Bake at 350 degrees for one hour. Remove from the oven and sit on a wire rack to cool. While the cake is still hot, pour the caramel sauce over it and then let it cool completely before removing from the pan.

For the hot caramel sauce: Put the sugar in a saucepan over low heat until it starts to melt. Add the butter. Swirl the pan until the butter melts. Add the milk. Bring to a boil, reduce heat to low and cook for 3 minutes, stirring constantly so it does not burn. Pour the hot caramel directly over the hot cake while it is still in the pan. Be careful- the hot sugar will burn!

NOTE: It is important to pour the caramel over the cake in the pan because it creates this great coating on the bottom, side and top of the cake. As much as you want to eat it, you have to allow it to cool completely before you remove it from the pan. Run a knife around the edge of the pan to help release it.

Print Friendly and PDF